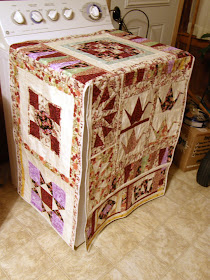
By now, you have probably seen several posts here about quilting with scraps. But, where on earth did they all come from? Believe me - I'm not buying fabric to cut it in little pieces. I refuse to throw away scraps, just because there is something beautiful and unexpected (and generally cheap) that can be made with them; you just have to to flex your crafty bone and get it going!
Practically all of the scraps came from my very first quilting project - kind of. My in-laws moved to a new house and they had been hunting for a cover. For some strange reason, their washer and drier are in the kitchen, and they were wanting to cover them. One day, my mother-in-law mentioned that she wanted something red. So there goes me, the one that always gets in trouble by attempting to make something new, exploring how to make something different and spend some time creating.
Mr. Fuzzband and I started talking about it, and I found out that there are quilt blocks that represent each of the states in the US. Yes, I found out - I'm fairly new to quilting, and it was like a gold mine kind of discovery. I wanted to quilt something with Georgia and Ohio, where my in-laws were born. Mr. Fuzz suggested something like, why not make something that shows all the states they've lived in and their time in Japan as well... Cool idea! Sure! And who's going to research and make all of that... Yep, you've got it! Me!!
So, here is to "A life time together" or "A memory quilt in the laundry!"
I even made a "map" with the name of all the blocks, so that they could identify the different states and it is also my reminder of the different techniques I used. We called it M & B's brick road...
These are what started it all: Ohio and Georgia!
Although I like the look of busy prints, I prefer to make blocks with fabric that allows the eye to "rest." That is why I used chunky frames around several blocks in this project; this also allowed me to have a sort of common denominator that unified the project, despite the variety of fabric prints. By the way, we really wanted to include Japanese fabrics, and the one that make our jaw drop was the black one with the fans - all the other fabrics were selected around this one. It is absolutely gorgeous!
For some reason, this little fellow decided to cling to the window and he stayed there for days... Nice quiet audience! lol
For some reason, this little fellow decided to cling to the window and he stayed there for days... Nice quiet audience! lol
I obtained most of the state block patterns from Bella Online's US State Quilt Blocks site. This is the Florida block; it is paper-pieced, and you can find the pattern by clicking on the link above.
The next one is Nebraska. This took me a while to piece, but I obtained a lot of extra half-square triangles that I used later in a little block to fill in the spaces and make even rows.
This is the Barbara Fritchie block. I got the instructions from Crafty's class Re-piecing the Past, with Kaye England. Also, I used a strip of my Paper-pieced block to even the shape and make a straight end.
The next block is New Mexico. I was not able to find instructions that I liked anywhere at the time... Now that I look back on this first quilting experience, I must also say that I was not familiar enough with all the terminology and techniques, so I may be able to find something that I can understand now and that will satisfy my crafty bone. I ended up drafting it myself. Now, this block has an eagle in the middle, but I decided to applique a circle. It ended up being much smaller than what I wanted it to be, but I used chunky pieces of fabric to frame it and obtain the size I needed.
The next block is "Road to Oklahoma." It is one of the first I made, and I was very happy to see that all the seams matched and the shape could be seen. I just had to do something different, and I used two different fabrics to offset it. It ended up pretty neat!
The next block is "Kansas Crossroads." I had to follow a picture, and I decided to snowball all of them. The great thing about this is that I ended with a lot of extra scraps and half square triangles to use in other projects!
M and B also spent about 24 years in Japan as missionaries. It was really important to include this part of their life in this project. After trying to find blocks to represent this county and its culture, I decided to use applique circles and an adaptation of Dresdens, to reminisce about the rising sun that is also part of the Japanese flag.
The following section is one that I'm really proud of. As in many other occasions in this project, this was my first time trying foundation paper piecing. In the left, there is a circle of geese; well, it's kind of two halves of a circle on top of each other. I used Piece by Number's Circle of Geese paper-pieced block.
For some reason, I also wanted a block that would point to the beautiful art of origami, and the paper cranes is what I wanted. I kept looking and looking in different places, and I ended up creating my own. I essentially took a picture of an original origami piece and started to play with the computer. I essentially inserted lines on top of each fold; I cut out the picture and only the lines were left. It was kind of tricky, particularly because I did not leave any room for seam allowance; however, I was really pleased with the result. So, my "window of cranes" lives now happily next to the geese...
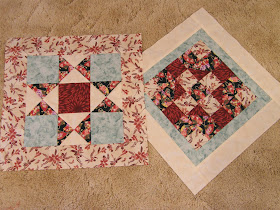
After mishaps, misreadings and patches, I had a bunch of scraps. I guess this was the crucial start of my fond for not letting them go and experiment with the little pieces left behind... The one in the left is my Pieced strip block and the one in the right is an improvisational log cabin block. I ended up using a lot of the background fabric, and I think that the log cabin effect was lost in the end. I did like the outcome, though.
The following is a diamond block made with the half-square triangles that were left from the Kansas block.
I did not really made a quilt - I did not use any batting. I basically quilted in the ditch around the main shapes of the blocks and the "frames." I used a plastic fabric that has fleece on one side of it. I also used this fabric for the binding.
Looking back at it, I can think and see all of the mistakes I made; I know where the seams are uneven, where I should have used more fabric, where the points don't match, where I skipped stitches, where a frame is missing... I'd better stop there! However, I'm glad with the overall result, particularly being my very first sort-of quilt!
I did get my living room back after everything was put together... lol. I just had to take a picture of the work in progress... :) It didn't last long, hehe.
I did get my living room back after everything was put together... lol. I just had to take a picture of the work in progress... :) It didn't last long, hehe.
These covers were also a special way of processing the fact that my in-laws have been used to bless many people in different areas - they have ministered in churches in all of the places where they've lived in; that's why there are so many blocks in these covers!
I'm not sure whether this would qualify as a memory quilt or not, but I'm certainly thankful for having them and for knowing that God always uses someone to take his blessings where it is needed.
And how about you? Have you ever made a memory quilt? What do you like to create in order to reminisce of special moments?
Happy memory-sort-of-quilting! :)


My mom's washer and dryer are in the kitchen too but they framed around the area (they face each other on opposite sides of a window) and put in louvered doors. I guess it's the best place for the water hookup. There is no basement. I've seen them installed in a bathroom too before.
ReplyDeleteI must confess this was unexpected for me; I was surprised to see the washer and drier in the kitchen, but they were happy with their choice. There was some talk about dividing the space, but I'm glad they kept on looking for a cover; otherwise, I would not have tried to make anything... It was a good learning experience for me, and they liked the covers - they have become the focus of conversations and it's rewarding to see them enjoying their gift! :) Thanks for reading Kathy!
ReplyDeleteWOW! What an undertaking for a first quilt!!! Most people start with something simple, like a 9 patch! I am amazed at this cover, it is just beautiful!
ReplyDeleteYou're so kind Francine! It was a huge project, but it was an awesome learning experience, from buying the wrong amount of fabric to redoing the same piece several times. It was a great opportunity to explore different techniques. I'm glad you like it! :)
ReplyDelete