Dec 27, 2015

Doodles: Feathers and FMQ

WIPs are slowly starting to get some attention here in The Hill (note I said SLOWLY...). Schedule changes have not been nice to my re-purposed dining room and projects are patiently waiting for some progress. Little by little (VERY little by little, things are advancing, and I hope to get some things ready soon.

In the meantime, I find ways to appease my crafty bone and work on portable stuff - more doodling it is! 


And yes, that's my "art" signature - it's my initials, now with my married name. It's also something that I've been practicing in free-motion quilting, and I generally quilt in one lower corner of the finished piece.

These times, I guess I'm learning about resourcefulness with all the changes; and I know that more are coming our way! In the meantime, I learned remembered a valuable lesson in sketching the hard way - whenever marking the area to work in, don't use a tool that cannot be taken away (a.k.a. use a pencil that can be erased afterwards!!!).

Well, playing along with life and thanking God for his blessings keeps Mr. Fuzz and I going.  

I hope you had a very good time during this Christmas!!

Stay blessed,

Yiya.

Dec 13, 2015

A runner on the making...

Oh my! Where does time go?

I feel like I have some catching up to do. But after a sort of emergency trip back in October, things have just not been the same, so I have had to get creative and exercise my crafty bone in different ways.  

Crayons, color pencils, markers and sketch books are all quite a bit easier to transport than a sewing machine, cutting mat, and all the itty bitty tools and what-nots that come with it. I do have a project that I may start taking with me, but I'm honestly missing being at the sewing machine and getting relaxed in its humming sound when little pieces of fabric come together and make something special.

Well, when we came back from that trip, Mr. Fuzz said that he would like to change something in the bedroom. And that something was including a sort of cover for the dresser... YAY!!! Quilt!!!  :D

I am always buying bundles or fabric leftovers when they are on sale, and I had Mr. Fuzz choose one of the bundles. I just felt sort of bad thinking of buying more fabric if I had neglected the 2015 Craftsy BOM already. Anyway, I got over that fast enough, and Mr. Fuzz chose the one I had in mind - it was one of those many happy coincidences that often live in our household...

Anyway, this is a modern quilt, and I am actually trying to follow instructions. However, after making nine blocks, I had this:


And you know what we make with scraps, right? Mini blocks from all those extra half-square triangles and scrappy units from itty bitty pieces of fabric. If you want to download instructions on how to make those units, you can click here to go to the link.


Adding them together to larger pieces...


... and eventually forming large enough units to form a block.


Although I'm following a pattern, this is my grain of salt in this happy, bright Fuzzy Quilt.


Well, there you go!

It's amazing how much can be done with scraps, and how much fun quilt units turn out to be!

Just imagine... All of this fabric would have ended up in the trash can! Hey, I'm all for recycling, especially when it looks this pretty... :)

I hope you have a blessed week,

Yiya.


Nov 21, 2015

Doodles: Blue feathers

Well, what to do when life happens, blog gets semi-abandoned and crafty time flies away with stuff to do?

Get creative! Yes! Get creative and find how to be creative with what you are given. Portability is not that easy with a big quilt, but a sketchpad and pens, colors and markers are...

And this is where The Hill will have some posts with not many words, but with lots of pictures that will hopefully be a testimony to getting creative with the time and resources we have... 

Ladies and gentlemen, doodles and sketches are back! And I give you blue feathers:


Enjoy and have a blessed weekend!

Yiya

Nov 14, 2015

More Quilt Show - Quilting!!

Some time ago, I posted about attending my first Quilt Show. Well, I was looking at the pictures, and I thought of sharing a bit more about it. One post is not enough to capture all the beauty and all the effect it had on me.

The feeling I had while I was there was remarkable; goose bumps, smiles, awe, excitement all rolled into one big ball that left me all gooey and fuzzy inside, hehe. 

So, here is a bit about the quilting and FMQ... I hope you enjoy it as much as I did!

Of course, there were several quilting patterns that did not exactly stayed withing the piecing.  The end result was gorgeous.  For some reason, my eyes found the combination of curves and points really interesting. I particularly liked this sort of piecing and quilting pattern overlap. And what about the denser quilting that makes those curves pop! The chains and the Gypsy Kisses (or Pickle dishes) look amazing together and they pull your eyes in this sort of road maze - mesmerizing! 

Wanda Jones, Osage Jewels
Unlike the previous quilt, the following one had quilting that stayed "inside the lines."  With a different quilting motif in each area, the end result is no less impressive!

Wanda Jones; Maker: Eve Murphi, Urban Pods by Sew Kind of Wonderful

And just look at this beauty!

Clarice Jones, Victorian Lace - Love Flowers, Quilted by Cindy Thompson, Pattern: Jan Douglas.
Again, I go back to how much I enjoy the combination of curves and points, but the added element of complimentary colors here is fantastic! 

A bit after, it was interesting to come across a modern, chevron quilt. I really liked the clean lines with the simple background.  I was about to go on to the next quilt, when something caught my attention. Can you see it? 

Gay Cooper, Rail Fence, Quilted by Wanda Jones


I knew it was there, but it took me a bit to see what my head saw... Does that even make sense? Anyway, the camera got it before I did - I promise!  My first glimpse at this great idea was through the lense... Well, the LCD screen... :)


It was the combination of those beautiful, more traditional quilted feathers in the negative space, combined with a more geometric quilted shapes on the pieced shapes that not only gave a different texture, but also worked as an extension of the  chevrons, all the way to the edge of the quilt. That playful, sneaky contrasting thread!!  What a neat idea!!

And how about a combination of cathedral windows, square 9-patches and gorgeous, dense feathers?

It took every ounce of self-control in me to stay away and not touch it.  I felt like running my fingers and following each thread, but I make the best effort and locked my hands behind me, so that they behaved! 

Lexi Wallace, Lexi's Dream, Quilted by Jan Dunaway.

Of course, I felt like running to my sewing machine after leaving the show, but alas! It's kind of difficult to do machine quilting on the go...

Ha! Never underestimate the power of a spare piece of paper and a writing utensil at hand! I had to go pick up Mr. Fuzz Husband, and I doodled while I was waiting for him. And the conversation went kind of like this:

Mr. Fuzz: "Oh! I see you went to the quilt show?"
Yiya: "Yes, I did!" (Big smile.)
Mr. Fuzz: "And that's what happened?" pointing at the paper in my hand.
Yiya: "Yes. I just had to start putting those ideas down on paper right away!"
Mr. Fuzz: "Good! That means you had fun. Now, what are we having for dinner?"

Oh! The fantastic world of marriage and crafts!

Have a blessed weekend,

Yiya


Nov 11, 2015

MIssy's Drawstring bag

Well, I believe drawstring bags are growing on me!  It turns out that they are practically THE perfect gift wrapping that is so cute and functional that it won't be throw away! 

(Yes, I seriously and silently feel sad each time I see all that beautiful wrapping paper that ends up in the trash. My recycling bone awakens each time it happens, and some of it has even ended making up greeting cards and all sort of things of beauty and love - but that's the stuff for another blog post.)

Time came for another gift, and yours truly had everything ready BUT a gift box/bag... I still sort of refuse really taking a good look at those, unless I will remake them into something else.

So... Missy... A sweet, sweet lady that loves purple and bright colors... I took a peek at my fabric, chose the three below and went back to Crafty's Bag-Making Basics: Drawstring Bag & Bucket Bag, with Kristin Link.


I really liked the way it came together!


And here is a close-up look at my cutting mat, with Kristin Link's instructions handy, to make sure I got things right.  


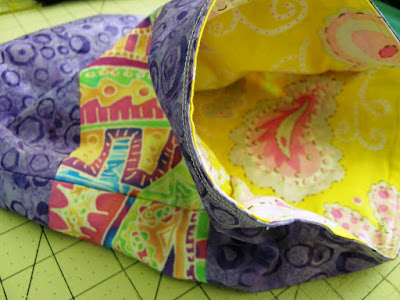
Here is Missy's bag finished, right on that spot on the carpet, now more like a "spot of fame," hehe...


Well, yes... It's a tad too big for nail polish, but she can use the bag for so many more things.

(Mental note: Take time and write down the math to make smaller baggies and use in the future.)


I really like how bright that lining fabric looks next to the purple...


And when you pull the drawstrings, it almost turns into a pretty flower!


If you like making things, this baggie is also easy to make and Kristin's class in Craftsy is free and she shows each step - it couldn't get easier!

And you? Do you personalize gifts?  I would love to hear how you do it!

Have a blessed day!

Yiya.


Sep 27, 2015

BOM 2015 - Irises and Y seams... Check!

We only have a week left in September, and I'm still trying to catch up with blogging about my 2015 Craftsy BOM blocks

I'm not really sure whether to start with saying that this block is actually the July block or with sharing that all of the blocks are finished now, and I actually completed the frames today!! YAY!! I can't wait to take lots and lots of pictures!!  It's really exciting that my first traditional quilt, which is also my first BOM, is almost finished!

But now, I need to go back to July and share about the beautiful irises - it's amazing what can be turned into a quilt!  So exciting!

Beginning with some mise en place... Everything ready to go, with seams marked in chalk, pieces stacked together, the middle stem already pieced... Everything just waiting to get sewn in the right place to live happily in the Iris block!


It took me a while to mark all the seams... Hehe... you can even see some chalk on the right side of the fabric!  (I had them all stacked on top of each other, but you cannot tell in the final block, phew!)


And yes, I made a tiny design decision and changed the color of the petals.  I wanted to show the range of color in the fabulous palette. I was liking every bit of it!


So, I started making my way along the Y seams; however, I was not very sure it was supposed to look like this,...  


... but things looked better after pressing!  Yay!!  My first Y seam flower down!


I also made my mind and decided to give hand piecing a try.  Not too bad, but I didn't like the way it looked after pressing; I ended up redoing that little triangle, but left my hand stitches there, just for mere romantic reasons... hehe!


I actually enjoyed doing the Y-seams. I have heard about them, and I have seen people in blogs talking about how to avoid them and sew the Y in different ways, just to avoid it all together. 

I wouldn't mind doing some more of them; I thought the flowers ended up looking quite nicely! There are also some other Y seams in some of the other blocks, and welcoming this new skill was refreshing... A little challenge doesn't hurt much, huh?


Throughout this quilt, I have put the pieces on the mat, just to take a peek at the finished block. This one was no exception - I got more and more excited each time I got to see things coming together.


Sadly, I got so excited, that something didn't look quite right when I saw this:


I couldn't believe that I made such a silly mistake - placing the squares in the wrong order! 

I was about to undo the seams, when I thought of the easy way out, but what would also become a sort of Easter egg in the final quilt... something to look for and talk about when the quilt is done!


And here is the official picture on the carpet, with the evening light coming through... 


I had that minute of excitement, knowing that I had learned something new and that it actually worked!  :)  

Have a blessed week!

Yiya

Sep 16, 2015

BOM: Getting started with appliqué

Well, technically, I think there is this kind of understood agreement that posts have to be chronological - at least for those efforts that build up to a project, like my 2015 BOM.

However, in my previous post, there was a little about my advance on the appliqued flowers. And this post is about that moment in June when I first started tracing the flowers, the one in July when I started cutting the shapes, some heres and theres, up to today, when I'm blanket stitching around them.

But, before I go on with more details, let's go back to the beginning.

So, I started with the tracing on freezer paper.


Then, I thought I'd better mark each piece with its letter and fabric number.


and... I didn't like it... lol

I tried using the freezer paper, but in between the turning, preparing and... well, lack of experience with applique, I ended up going back with something that I've done before: fusible web.
  

Of course, I had to retrace everything again, but I knew I was heading in the right direction.  After all, this is the technique that I used for Terminal Bee and it ended up looking quite well. 


After one or two TV episodes, this is all I had:


... it eventually made it into baggies, just to make sure all the pieces stayed in their place.


I liked when they were all like in the next picture; the beautiful fabric looks pretty also from the back.


I took them with me everywhere I went, so that I could work on them whenever possible. What I didn't like is the scissors... They are good scissors, but things go WAY slower with the smallies... Oh well! They work and they make really precise cuts.


Finding a bit of time here and there, I was able to -eventually- get all the pieces done.  

As I post this, all of the pieces have made it to a block and I'm working on stitching around them. Now, whenever I need a break at home, I take five or ten minutes (yeah, right... about one hour!) and blanket stitch around a petal or two... or three... or four...

This part of making the 2015 Craftsy's BOM is probably what got me more frustrated.  I even voiced my five-minute breakdown, thinking that I had taken a really complicated challenge this time - one which does not allow me to bend rules and makes me stick to it.  

Then, I had the five-minute picker-upper, thinking of all the lessons I've learned so far, and how my piecing has improved. I actually took a time to see all the blocks that I've finished so far. They are... well, different. It's obvious that the first one has a bunch of mistakes; I'll probably re-do it at the end, once I've finished all the blocks and know I have enough fabric to get a second one out of it. 

Go figure! From too much to "one more."

Learning experiences are always there, waiting for us to take advantage of them. 

So far, I'm getting there bit by bit, and it's really exciting to be able to share it with all of you.

Today is Wednesday... let's see if these beauties can be finished by Sunday! In the meantime, be blessed!

Yiya

Sep 14, 2015

What did you do on the weekend?

Weather is starting to change, and I feel I'm finally making some progress in my quilting. I about decided to dedicate some time to it at least three times a week, so that things get going. And yes, this post will have to count as one of those three times this week.

I feel like there were two major things accomplished that feel like a huge advance in my quilting projects.

I think I don't actually realize that things wear and get old... After attempting to cut fabric twice unsuccessfully, I finally took a long, good look at my poor cutting mat... No wonder why things were not working!  


I ended up turning the mat and using an indelible marker to mark 1, 2, 3, 4, 5... inches where I had 24, 23, 22... Hey, I'm good for ingenuity that keeps me going without so much effort! It felt like I was cutting butter after doing this - I just can't believe I waited so long to get it done. I can just begin to imagine how far ahead it will let me go with fast and accurate cutting.

Another major step are these little guys. 


The fusible web had been on the fabric for a while; Kathy came and visited about two weeks ago, and I finished cutting all the pieces. They are now anxiously waiting to get to their final destination in the gorgeous baskets... I hope!

So, not a long post, but excited about going forward.

How did you go forward this weekend?

Stay blessed,

Yiya


Sep 7, 2015

BOM: Baskets!

Well, who said things had to stay the same all the time?

When I first started my quilting adventures, I never thought I would be working on a year-long project with bunches of baskets! 

The 2015 Craftsy BOM has brought challenging opportunities to overcome and fall for this wonderful craft over and over again!  

I look back at these five blocks, and smile as I remember the challenges of understanding a very basic skill - pattern reading. I think it was the beautiful fabric that got me involved, and it has been fantastic.  I keep working bit by bit and some of these will get appliqued flowers very soon.  I couldn't resist but snapping a quick pic to remember how they all look like together. Pieced handles, bias-cut handles, matching points... A smile comes out and I feel grateful for the opportunity of enjoying the creative process.


I once said that I'd never quilt baskets - ha! Better watch out for next time I say I'll never quilt something - I may end up making a whole quilt of them...

Until next time... Have a blessed week!

Yiya.

Aug 24, 2015

Happy Weekend!

Hello!

Well, I know it's Monday and Monday is generally not the weekend... However, I think it's about time to post something that is up to date.  So, even though this post will be a short one, I'm happy to share what my work table looked like two days ago:


Yep, that's right... That's one of the 2015 Craftsy BOM blocks and some of the applique is finished. I decided to use some of my embroidery thread, which I rarely use, good for embroidery (obviously), that I almost never make, in order to blanket stitch around the applique. I used some blue Isacord that I've used before for FMQ (click here or here to see the FMQ samples), and the embroidery thread will be for the leaves and stems. 

I was not looking for a color that stood out, but for something discrete, that would not take away from the piecing or the gorgeous fabric. I've found that the best way to audition a thread is just take a bit of it and put it on top of the fabric to get a fairly good idea of how it would look once finished. So, the darker thread made the cut!  It's interesting how the olive green threads look blue-ish, gray-ish in the picture - maybe that's why I didn't like them for this project, in the first place... Interesting...

Anyway, you may also spot some colorful squares... Well, that is a side project I started working on. I'll post on it, and will blog about it, eventually...

In the meantime, applique flowers get done little by little and I'll still keep trying to sneak in a post here and there.

I hope you have a blessed week!  

Yiya


Aug 14, 2015

MIA - Basket blocks

Hello everybody!

I have been kind of all over the place lately.  This week has been crazy so far, and I kept thinking of creative ways of finding a quiet moment that would actually help me forget the rush, rush, rush of work at least for a second... This week I traveled to another location for training related to work, which I really like doing, but it seems to make things crazier in the office for the time we come back.  I know that only happens to me... Lol!!

I'm just trying to get to the point with a good story -or a half-decent one- about how I was caught up in the frenzy and decided to make the most out of lunch, go to one of my favorite places, hook up to the internet and come to this little corner of the woods that keeps words flowing, with my fingers trying to play catch-up, and my brain suddenly forgetting about everything that was in there twenty minutes ago...

So, let's get to business here and have a good laugh at my inadequate abilities to rescue pictures from a low battery camera... Remember the black pictures in my previous BOM post? Well, here they are!


I got a different kind of batteries (rechargeable, of course), but tougher. I already had a set of those who can handle the flash, but I got some that are supposed to be even tougher. I'm not a battery expert, but Mr. Fuzz thought it would be a good idea, and the camera has been working great! 

I'm so glad I was able to get this picture "back;" the two blue baskets with the pieced centers seem to glow with the right amount of evening light coming through the living room door. 


A little witness of my slow advances in the 2015 BOM that keeps feeling like a major milestone; challenging baskets that keep pushing me into precision piecing and even provide a little relaxing escape from a frantic week... Smile! 

We can keep going, and every day, with ups and downs, we are breathing and something inside tells us that we can make it...  How wonderful to know that God blesses us in such wonderful ways! Even though we may not share the same beliefs, I hope you get to experience hope and joy to the fullest!

Stay blessed,

Yiya